Logo Pending


Little Black Book – Larry 2 Copy Protection

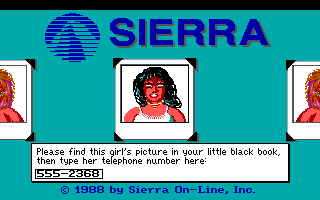
It’s been a while now since I last explained a Sierra game’s copy protection, so why not go at it again?

Compared to KQ4, LSL2 has only a few different options, and it involves no math.

(local
  phoneNum     ; The correct answer.
  [input 6]    ; Our guess. 11 characters max, but 16-bit values so 12/2=6
  ; The photo parts are put in hunk space instead of heap or something.
  dressView
  faceView
  hairView
  earringView
)
 
(instance rm10 of Rm
  (properties
    picture 10
    style dpOPEN_CHECKBOARD
  )
 
  (method (init &tmp dress face hair earring)
    (ProgramControl)
 
    ; Preload the photo and logo parts
    (Load rsVIEW 60)
 
    (super init:)
 
    ; For each part of the logo, create a new view in hunk space, and addToPic it.
    ; Adding a view to the pic causes it to be disposed, so in the end none of the logo parts take space.
    ((View new:) view: 60 loop: 4 cel: 0 posn:  72  52 setPri: 1 addToPic:) ; Logo
    ((View new:) view: 60 loop: 4 cel: 1 posn: 122  36 setPri: 0 addToPic:) ; S
    ((View new:) view: 60 loop: 4 cel: 2 posn: 141  35 setPri: 0 addToPic:) ; I
    ((View new:) view: 60 loop: 4 cel: 3 posn: 161  35 setPri: 0 addToPic:) ; E
    ((View new:) view: 60 loop: 4 cel: 4 posn: 190  35 setPri: 0 addToPic:) ; R
    ((View new:) view: 60 loop: 4 cel: 4 posn: 221  35 setPri: 0 addToPic:) ; R
    ((View new:) view: 60 loop: 4 cel: 5 posn: 252  35 setPri: 0 addToPic:) ; A
    ((View new:) view: 60 loop: 5 cel: 0 posn:  13 113 setPri: 7 addToPic:) ; Left girl
    ((View new:) view: 60 loop: 6 cel: 0 posn: 306 113 setPri: 7 addToPic:) ; Right girl
 
    ; Now create views for the photo parts.
    ((= dressView   (View new:)) view: 60 loop: 0 cel: 0 setPri: 1 posn: 154 981 init:)
    ((= faceView    (View new:)) view: 60 loop: 1 cel: 5 setPri: 2 posn: 154 981 init:)
    ((= hairView    (View new:)) view: 60 loop: 2 cel: 1 setPri: 3 posn: 154 981 init:)
    ((= earringView (View new:)) view: 60 loop: 3 cel: 4 setPri: 4 posn: 154 981 init:)
 
    ; I left out most of the answers in the interest of fairplay and conciseness.
    (switch (Random 1 16)
      (1 (= dress 0) (= face 5) (= hair 1) (= earring 4) (= phoneNum "555-7448"))
      (2 (= dress 1) (= face 5) (= hair 2) (= earring 4) (= phoneNum "555-5968"))
      ; ...
      (15 (= dress 2) (= face 4) (= hair 0) (= earring 2) (= phoneNum "555-5633"))
      (16 (= dress 1) (= face 1) (= hair 3) (= earring 2) (= phoneNum "555-5834"))
    )
 
    ; Now apply the traits chosen above.
    (dressView   posn: 154 81 setLoop: 0 setCel: dress)
    (faceView    posn: 154 81 setLoop: 1 setCel: face)
    (hairView    posn: 154 81 setLoop: 2 setCel: hair)
    (earringView posn: 154 81 setLoop: 3 setCel: earring)
 
    (Animate)
    (Display "© 1988 by Sierra On-Line, Inc." dsCOORD 60 176 dsCOLOR 1 dsBACKGROUND 3)
  )
 
  (method (doit)
    (Format @input "555-")
    (Print
      "Please find this girl's picture in your little black book, then type her telephone number here:"
      #at -1 144
      #width 248
      #font gFont
      #edit @input 11 ; add a textbox, max length 11.
    )
 
    ; Reminder: like in C, StrCmp returns zero if the inputs are equal, and zero is false. Hence the not.
    (if (not (StrCmp @input phoneNum))
      (gRoom newRoom: 90)
    else
      (Print "Sorry, but you need to spend more time staring at beautiful women!
              In order to play this game, you must have the original documentation.
              If you've lost your little black book, please telephone Sierra's
              Customer Support Department at the number printed on your disks.")
      (= gQuit true)
    )
  )
)

I can think of a few ways to improve this, and in fact I already did in some places — this is not the original LSL2 copy protection! Can you think of more ways to improve this script?
[ , , , ] Leave a Comment

What do SQ5 and LSL5 have in common?

Things being typed out in their introduction.

In Space Quest 5, the introduction has a sequence where Roger Wilco dictates a captain’s log. The text appears word-for-word, though it’s pretty easy to modify the script code and make it character-by-character. But before I can explain the intricacies of that scene, I must ensure you know how a Scriptworks.

No, not a script file, a Script object. They are in essence state machines, with a state property, a changeState method, a cue method, and two timer properties, cycles and seconds. The changeState method is the beef of it all, containing the code for each state. The cue method simply takes the current state, adds one, then invokes changeState with that value. The doit method checks if either of the two timers is nonzero, decrements them accordingly, and invokes cue when time runs out. In general, you only need to implement your own changeState. Other objects may also cue a script. A good example would be waiting for an Actor to move to a particular position. They would know which Script is waiting for them and cue them at the appropriate time. Until then, the Script sits on its thumbs.

Knowing that, let’s take a look at the captain’s log:

; Earlier in the file...
(local
  [logInput 200]
  [logWritten 200]
  ; Remember: these are 16-bit values, so 400 characters.
  page
  length
  cursor
)
 
(instance sCaptainsLog of Script
  (method (changeState newState)
    (switch (= state newState)
      (0
        (Message msgGET 104 1 0 0 page @logInput) ; Grab the current page worth of text.
        (= length (StrLen @logInput)) ; Remember how long the line is.
        (= cursor 0) ; Reset our typing cursor
        (= cycles 1) ; Near-immediately continue -- we could self-cue though?
      )
      (1
        (repeat
          ; Copy one character...
          (StrAt @logWritten cursor (StrAt @logInput cursor))
          ; ...and add a terminating zero so we don't write garbage.
          (StrAt @logWritten (++ cursor) 0)
 
          ; Stop copying if we find...
          (if
            (or
              (== (StrAt @logInput (- cursor 1)) 32) ; a space...
              (== (StrAt @logInput (- cursor 1)) 0) ; or the end of the text.
            )
            (break)
          )
        )
 
        ; Put what we've copied so far on screen.
        (Display @logWritten dsCOORD 40 10 dsCOLOR 254 dsFONT 1307 dsWIDTH 250)
 
        ; If we haven't reached the end of the text yet...
        (if (> length cursor)
          (-- state) ; rewind to state 0 so the next cue is for state 1 again!
          (= ticks 15)
        )
      )
      (2
        ; The rest doesn't matter here.
      )
    )
  )
)

If one wished to write character-by-character, you’d just remove most of the repeat:

(StrAt @logWritten cursor (StrAt @logInput cursor))
(StrAt @logWritten (++ cursor) 0)
 
(Display @logWritten dsCOORD 40 10 dsCOLOR 254 dsFONT 1307 dsWIDTH 250)
 
(if (> length cursor)
  (-- state)
  (= ticks 15)
)

That was pretty easy, all things considered. I think the more interesting example to study would be the subtitle in Leisure Suit Larry 5 – Passionate Patti does Pittsburgh a Little Undercover Work.

First, we need a few local variables and, just to keep things orderly, a procedure:

(local
  cursor
  typePos
  [subtitle 50] = "Passionate Patti does PittsbuA Little Undercover Work"
  ; Notice this: "Pittsbu" is character 22 to 29.
  [backspaces 12]
)
(procedure (typeAway &tmp [oneChar 2] char underbits)
  ; Grab the current character to type.
  (= char (StrAt @subtitle cursor))
  ; Put it in a string -- just that character and a terminating null.
  (Format @oneChar "%c" char)
 
  ; Draw it, preserving what was underneath.
  (= underbits (Display @oneChar dsCOORD typePos 160 dsCOLOR global128 dsWIDTH 7 dsALIGN alLEFT dsFONT global173 dsSAVEPIXELS))
 
  (if (and (< 21 cursor) (< cursor 29)) ; Are we typing "Pittsburgh"?
    (= [backspaces (- cursor 22)] underbits) ; Then put those underbits pointers in the backspaces array.
  else
    (UnLoad 133 underbits) ; No need for these underbits, throw 'em away.
  )
 
  (= typePos (+ typePos 7)) ; Advance our drawing cursor...
  (if (== 32 char) (= typePos (- typePos 2))) ; ...but make the space a little bit thinner.
)

Further down there’s a Script that handles the entire opening cartoon. I’ll skip the boilerplate and only show the relevant parts.

(14
  (patti setMotion: MoveTo 335 140) ; This all happens while Patti walks past.
  (= cursor 0) ; Reset our type.
  (= typePos 3)
  (larry setScript: sLarryCartoon) ; Larry reacts on his own.
  (= cycles 1)
)
(15
  (typeAway) ; Type ONE character.
  (typewriter play:) ; Make some noise...
 
  (if (< (++ cursor) 29) ; Increment the cursor -- if it's not at the 'u' in "Pittsbu" yet...
    (= cycles (Random 3 5)) ; ...randomly delay the next character...
    (-- state) ; ...and rewind as shown in SQ5.
  else
    (= cycles 10) ; We've reached the 'u'. Wait and cue up state 16.
  )
)
(16
  ; Grab the right underbits from our array and restore it.
  (Display "" dsRESTORE [backspaces (- (-- cursor) 22)])
  ; Underbits include not only pixel data but also their bounds, so that's easy.
 
  (backSpace play:)
  (if (> cursor 22) ; Are we not yet back at the space before "Pittsbu"?
    (= cycles 4) ; Then rewind at four cycles a backspace.
    (-- state)
  else
    (= typePos 153) ; Reset to where the 'P' was...
    (= cursor 29) ; ...and skip to the 'A' in "A Little"
    (= cycles 10)
  )
)
(17
  ; The rest is much the same as state 15...
  (typeAway)
  (typewriter play:)
 
  ; ...except for this check.
  (if (< (++ cursor) (StrLen @subtitle))
    (-- state)
    (= cycles (Random 3 5))
  else
    (= cycles 10)
  )
)
[ , , , ] Leave a Comment

Unusual arrow keys and cursor behavior

Most players of SCI games would naturally gravitate to using the mouse if it’s an SCI1 game or later. With SCI0 using a text parser and no pathfinding it strikes me personally as more efficient to just use the arrow keys in those games. But that’s just me. The important part here is that some SCI11 games don’t respond to the arrow keys the same way as others do.

SCI0 being effectively stateless in a way, pressing the arrow keys will cause your character to start walking in that direction. Clicking somewhere causes them to walk there in a straight line until something gets in the way. In SCI1 the icon bar introduced a kind of state in that you have several active cursors. In all but a few adventure games, pressing the arrow keys will cause your character to move if the current cursor is Walk. Otherwise, the cursor itself moves around. So if the current cursor is, let’s say, Look, the little eye moves instead of the main character. Unless of course you’d already set them on their way. And of course (unless you’re playing the original KQ5) clicking somewhere with the Walk cursor makes your character find their way around obstacles towards that point.

Two exceptions to this rule that I know of are Space Quest 5 and King’s Quest 6. It turns out if you press the arrow keys with the Walk cursor out, the cursor itself moves. Why is that?

Obviously, there’s something in the game scripts that causes both the usual and specific behavior. Let’s look at both.

The usual behavior is enabled by the Ego class and its handleEvent method. Called from User, this method checks for direction and walk events. If it’s the former, an arrow key was pressed or a joystick was nudged. If it’s the latter, we clicked the Walk cursor somewhere. How do we know it’s Walk? Because User only calls this method if it was. Any other cursor, it runs further down and ends up calling another script that handles moving the cursor around if you press an arrow key.

(method (handleEvent pEvent &tmp eType dir)
  (= eType (pEvent type?))
  (cond
    ; First, see if we have a script that wants the event.
    ((and script (script handleEvent: pEvent)) true)
 
    ; See if it's a direction event
    ((& eType evJOYSTICK)
      (= dir (pEvent message?))
 
      ; don't claim dirStop/CENTER
      (if (and (== dir CENTER) (& eType evKEYBOARD))
        (return (pEvent claimed?))
      )
 
      ; Pressing the same key that started a motion again should stop
      (if (and (& eType evKEYBOARD) ; it's a key
               (== dir (gUser prevDir?)) ; same dir as before
               (IsObject mover)) ; ego is moving
        (= dir CENTER)
      )
 
      ; In the case of a keyDown event, keep the previous direction,
      ; so we know what key stops ego.
      (gUser prevDir: dir)
 
      ; Actor::setDirection sets ego off to walk.
      (self setDirection: dir)
      (pEvent claimed: true)
    )
 
    ((& eType evVERB)
      (if (& eType evMOVE)
        (switch gEgoUseObstacles
          (0 (self setMotion: MoveTo (pEvent x?) (+ (pEvent y?) z)))
          (1 (self setMotion: PolyPath (pEvent x?) (+ (pEvent y?) z)))
          (2 (self setMotion: PolyPath (pEvent x?) (+ (pEvent y?) z) null false))
        )
        (gUser prevDir: 0)
        (pEvent claimed: true)
      else
        (super handleEvent: pEvent)
      )
    )
    (else (super handleEvent: pEvent))
  )
  (return (pEvent claimed?))
)

You might notice the bit about gEgoUseObstacles.  Setting that to zero effectively makes clicks act like in SCI0. At least to the player — the script code is somewhat different.

Now that just leaves the question of why these two games don’t react like that. And it’s really very simple. KQ6 and SQ5 do it each in their own slightly different way, but the basic trick is the same. Because KQ6 seems a bit neater to me, I’ll show that one first:

(instance ego of Ego
  ; Irrelevancies elided
 
  (method (handleEvent pEvent)
    (return
      (if (& (pEvent type?) evJOYSTICK)
        ; Refuse to handle any directional inputs
        (return false)
      else
        ; Let the original Ego class figure it out
        (super handleEvent: pEvent &rest)
      )
    )
  )
)

Simple, huh? Because this returns false for any direction events, User will always end up percolating the event down to PseudoMouse and as such the Walk cursor is moved by the keyboard or joystick instead of the player character. Now let’s see how this compares to Space Quest 5.

(class SQEgo of Ego
  ; Irrelevancies elided
 
  (method (handleEvent pEvent &tmp eType eMsg)
    (= eType (pEvent type?))
    (= eMsg (pEvent message?)) ; woo wasted effort!
    (return
      (cond 
        ((and script (script handleEvent: pEvent)) true)
        ((& eType evJOYSTICK) (return false))
        (else (super handleEvent: pEvent &rest))
      )
    )
  )
)

Seems pretty clear considering what we already know. So much so I won’t bother documenting it much.

The SCI Companion SCI11 template game is based on SQ5 so by default this too applies to any game you make with it. The obvious way to remove this then is to remove GameEgo::handleEvent. I did, and I haven’t looked back since.

[ , ] Leave a Comment

On SCI Windows – Part 7 – The Dating Pool

It was inevitable, really, that I’d end this series with my own game. The Dating Pool uses a simplified take on BorderWindow, with the ability to change the thickness removed.

could’ve just used a BorderWindow, in fact, with bevelWid and shadowWid both set to 1 and I’d get the exact same result. This exact style was in fact one of the examples I’ve shown back there! But I did not, if only because I use titles sometimes.

(class cdWindow of SysWindow
  (properties
    topBordColor 7
    lftBordColor 6
    rgtBordColor 4
    botBordColor 3
    titleBack 3
    titleColor 255
  )
 
  (method (open &tmp oldPort screens)
    ; The established setup
    (= screens VISUAL)
    (if (!= priority -1) (|= screens PRIORITY))
 
    ; Make room for the edges
    (= lsTop (- top 2))
    (if title (-= lsTop 9))
    (= lsLeft (- left 2))
    (= lsRight (+ right 3))
    (= lsBottom (+ bottom 3))
 
    ; Set our custom style
    (= type 128)
 
    ; Always top priority
    (= priority 15)
    (super open:)
 
    ; Now we draw, on the whole screen.
    (= oldPort (GetPort))
    (SetPort 0)
 
    ; Draw our fill...
    (Graph grFILL_BOX top left bottom right screens back 15)
 
    ; Custom title bar support!
    (if title
      (-= top 9)
      (+= bottom 1)
      (Graph grFILL_BOX top left (+ top 9) right screens botBordColor titleBack)
      (Display title dsCOORD left top dsWIDTH (- right left) dsCOLOR titleColor dsFONT 999 dsMODE alCENTER)
    )
 
    ; Draw the frame
    (Graph grDRAW_LINE (- top 1) (- left 1) (- top 1) right topBordColor priority screens)
    (Graph grDRAW_LINE (- top 1) (- left 1) (- bottom 1) (- left 1) lftBordColor priority screens)
    (Graph grDRAW_LINE (- bottom 1) left (- bottom 1) right botBordColor priority screens)
    (Graph grDRAW_LINE top right (- bottom 2) right rgtBordColor priority screens)
 
    ; Draw our drop shadow
    (Graph grDRAW_LINE bottom (+ left 1) bottom right 0 priority screens)
    (Graph grDRAW_LINE top (+ right 1) bottom (+ right 1) 0 priority screens)
 
    ; Show what we have wrought.
    (Graph grUPDATE_BOX (- top 1) (- left 1) (+ bottom 1) (+ right 1) VISUAL)
    (SetPort oldPort)
  )
)

Eagle-eyed viewers might notice that the color properties are set to various grayscales while the image up top is green. This is simply because the instance of this cdWindow class has those colors. The control panel, in contrast, is tan.

And that’s the end of this series. If you have any other SCI games (preferably SCI11 or earlier) that you’d like to see, drop me a line in the comments below and I’ll see what I can do. Barring any of that though…

[ , , ] 2 Comments on On SCI Windows – Part 7 – The Dating Pool

On SCI Windows – Part 6 – Laura Bow, Frontier Pharmacist

It’s a double feature this time because these last two games’ windows are very similar.

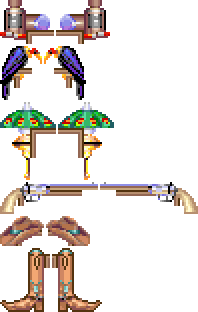
These windows have decorations depending on your location or progress. Here are the view resources, both of them #994…

…and here is the code for the lb2Window first:

(instance lb2Win of SysWindow
  (properties
    ; This time, we set the custom bit up here.
    type 128
  )
 
  (method (open &tmp oldPort loop)
    ; Decide which decoration to show depending on our location.
    ; (These have been cut down a bit and the doubles were already
    ;  there. I don't know what's up with that.)
    (cond 
      ((OneOf gRoomNumber 280 210 330 240 260 300) (= loop 0))
      ((OneOf gRoomNumber 210 220 230 260 270 280) (= loop 1))
      ((OneOf gRoomNumber 100 105 110 120 140 150) (= loop 2))
      ((OneOf gRoomNumber 460 660 700 710 715 720) (= loop 4))
      ((OneOf gRoomNumber 335 340 350 355 360 370) (= loop 3))
      (else (= loop 4))
    )
 
    ; Make room for the edges, including the decorations.
    (= lsLeft (- left (/ (CelWide 994 loop 0) 2)))
    ; Yes, LB2 windows adjust for titles, despite the custom bit.
    (= lsTop (- top (if title 19 else 10)))
    (= lsRight (+ right (/ (CelWide 994 loop 0) 2)))
    ; Be at *least* as tall as the decoration.
    (= lsBottom (Max (+ bottom 3) (+ lsTop (CelHigh 994 loop 0) 3)))
 
    ; Always top priority
    (= priority 15)
    (super open:)
 
    ; Now we draw, on the whole screen.
    (= oldPort (GetPort))
    (SetPort 0)
 
    ; Draw our fill...
    (Graph grFILL_BOX top left bottom right 3 gBack 15)
    ; ...border...
    (Graph grDRAW_LINE (- top 1) (- left 1) (- top 1) right gFore 15)
    (Graph grDRAW_LINE (- top 1) (- left 1) bottom (- left 1) gFore 15)
    (Graph grDRAW_LINE bottom (- left 1) bottom right gFore 15)
    (Graph grDRAW_LINE (- top 1) right bottom right gFore 15)
    ; Show what we have wrought...
    (Graph grUPDATE_BOX top left bottom right 1)
    ; ...but also dirty the part where the decorations will go.
    (Graph grUPDATE_BOX lsTop lsLeft (+ lsTop (CelHigh 994 loop 0)) (+ lsLeft (CelWide 994 loop 0)) 1)
    (Graph grUPDATE_BOX lsTop (- lsRight (CelWide 994 loop 0))  (+ lsTop (CelHigh 994 loop 0)) lsRight 1)
    ; Why? I have no idea.
 
    ; Now draw the decorations!
    (DrawCel 994 loop 0 (+ lsLeft 1) (+ lsTop 1) -1)
    (DrawCel 994 loop 1 (- (- lsRight (CelWide 994 loop 0)) 1) (+ lsTop 1) -1)
 
    (SetPort oldPort)
  )
)

Don’t let the thicker right edge fool you — half that line is part of the decoration!

As I said, the code for fpWin is remarkably similar… yet different? Most of it’s just in how the thicker edges are drawn, but a significant bit is in the last part:

(instance fpWin of SysWindow
  (properties
    type 128
  )
 
  (method (open &tmp oldPort loop theLsTop theLsLeft theLsRight)
    ; Decide which decoration to show depending on the act.
    (switch gAct
      (1 (= loop 0))
      (2 (if (Bset 1) (= loop 2) else (= loop 1)))
      (3 (= loop 3))
      (4 (= loop 4))
      (5 (= loop 4))
    )
 
    ; Make room for the edges, including the decorations.
    (= lsLeft (- (- left 3) 15))
    (= lsTop (- (- top 3) (if title 25 else 15)))
    (= lsRight (+ right 3 15))
    (= lsBottom (Max (+ bottom 3) (+ lsTop (CelHigh 994 loop 0) 3)))
 
    ; Always top priority
    (= priority 15)
    (super open:)
 
    ; Now we draw, on the whole screen.
    (= oldPort (GetPort))
    (SetPort 0)
 
    ; Draw our fill...
    (Graph grFILL_BOX top left bottom right 3 gBack 15)
    (if title (= top (- top 10)))
 
    ; Inner box, middling dark...
    (Graph grDRAW_LINE (- top 1) (- left 1) (- top 1) right 17 15)
    (Graph grDRAW_LINE (- top 1) (- left 1) bottom (- left 1) 17 15)
    (Graph grDRAW_LINE bottom (- left 1) bottom right 17 15)
    (Graph grDRAW_LINE (- top 1) right bottom right 17 15)
    ; Middle box, lighter...
    (Graph grDRAW_LINE (- top 2) (- left 2) (- top 2) (+ right 1) 19 15)
    (Graph grDRAW_LINE (- top 2) (- left 2) (+ bottom 1) (- left 2) 19 15)
    (Graph grDRAW_LINE (+ bottom 1) (- left 2) (+ bottom 1) (+ right 1) 19 15)
    (Graph grDRAW_LINE (- top 2) (+ right 1) (+ bottom 1) (+ right 1) 19 15)
    ; And finally the outer, darkest box.
    (Graph grDRAW_LINE (- top 3) (- left 3) (- top 3) (+ right 2) 16 15)
    (Graph grDRAW_LINE (- top 3) (- left 3) (+ bottom 2) (- left 3) 16 15)
    (Graph grDRAW_LINE (+ bottom 2) (- left 3) (+ bottom 2) (+ right 2) 16 15)
    (Graph grDRAW_LINE (- top 3) (+ right 2) (+ bottom 2) (+ right 2) 16 15)
 
    ; Show what we have wrought.
    (Graph grUPDATE_BOX (- top 3) (- left 3) (+ bottom 3) (+ right 3) 1)
 
    ; Unlike LB2, FPFP does this part the hard way.
    (switch gAct
      (1
        (= theLsLeft (+ lsLeft 2))
        (= theLsRight (- (- lsRight 15) 14))
        (= theLsTop lsTop)
      )
      (2
        (if (Bset 1)
          (= theLsLeft lsLeft)
          (= theLsRight (- (- lsRight 15) 13))
          (= theLsTop (+ lsTop 2))
        else
          (= theLsLeft (+ lsLeft 8))
          (= theLsRight (- (- lsRight 15) 14))
          (= theLsTop (+ lsTop 4))
        )
      )
      (3
        (= theLsLeft (+ lsLeft 6))
        (= theLsRight (- (- lsRight 15) 40))
        (= theLsTop (+ lsTop 11))
      )
      (4
        (= theLsLeft (+ lsLeft 7))
        (= theLsRight (- (- lsRight 15) 14))
        (= theLsTop (+ lsTop 8))
      )
      (5
        (= theLsLeft (+ lsLeft 7))
        (= theLsRight (- (- lsRight 15) 14))
        (= theLsTop (+ lsTop 8))
      )
    )
 
    ; Now draw the decorations!
    (DrawCel 994 loop 0 theLsLeft theLsTop -1)
    (DrawCel 994 loop 1 theLsRight theLsTop -1)
 
    (SetPort oldPort)
  )
)

I don’t know why either. Maybe something silly about the decorations?

[ , , , ] Leave a Comment

On SCI Windows – Part 5 – Police Quest 4 but not

Police Quest IV – Open Season is an SCI2 game. As such, it had a radically different way of doing several things. It’s not too hard though to backport one of its elements, namely its translucent windows.

I’ve tweeted about this at length, and actually had to reimplement it all over again. But I did it.

(class TranslucentWindow of SysWindow
  (method (open &tmp oldPort screens scaleX scaleY)
    ; Your standard setup, KQ6 style...
    (= lsLeft (- left 1))
    (= lsRight (+ right 1))
    (= lsTop (- top 1))
    (= lsBottom (+ bottom 1))
 
    (= type 128)
    (= priority 15)
    (super open:)
 
    (= oldPort (GetPort))
    (SetPort 0)
    (= screens VISUAL)
    (if (!= priority -1) (= screens (| screens PRIORITY)))
 
    ; 128 is 100% of the source image size, which is 8x8.
    ; (128 / source) * target --> 16 * target.
    (= scaleX (* (- lsRight lsLeft) 16))
    (= scaleY (* (- lsBottom lsTop) 16))
    (DrawCel 923 1 0 lsLeft lsTop 15 scaleX scaleY)
 
    ; Draw the frame
    (Graph grDRAW_LINE lsTop lsLeft lsTop (- lsRight 1) 0 -1 -1)
    (Graph grDRAW_LINE (- lsBottom 1) lsLeft (- lsBottom 1) (- lsRight 1) 0 -1 -1)
    (Graph grDRAW_LINE lsTop lsLeft (- lsBottom 1) lsLeft 0 -1 -1)
    (Graph grDRAW_LINE lsTop (- lsRight 1) (- lsBottom 1) (- lsRight 1) 0 -1 -1)
 
    ; Show what we have wrought.
    (Graph grUPDATE_BOX (- lsTop 4) (- lsLeft 4) (+ lsBottom 4) (+ lsRight 4) 1)     
    (SetPort oldPort)
  )
)

You’ll also need to do something about DText, up in Interface.sc, or you’ll get ugly opaque text in a translucent window. I use my own extended interpreter so I get the drop shadow for free, but here’s the deal:

(class DText of DItem
  ; Rest of the class elided.
  (method (draw)
    ; We don't get to use hotspot rects anymore, sorry.
    (Display text dsFONT font dsCOORD nsTop nsLeft dsWIDTH (- nsRight nsLeft) dsCOLOR 7 dsBACKGROUND -1 dsALIGN mode)
  )
)

And yeah, the color’s pretty much fixed too — the DrawControl kernel call uses the current port’s colors, which would be the window’s. No such luck unless you significantly mess with things to not only add a color property to DText but also set it somehow while not actually invoking DText yourself so yeeeeaaah this might not be the window style for you.

[ , , ] Leave a Comment

On SCI Windows – Part NaN – The Colonel’s Bequest

I was going to cover Laura Bow – The Colonel’s Bequest but it turns out its custom window is almost exactly the same as the one in KQ5 and it’d be faster to just go over the differences.

  1. No drop shadow.
  2. No color properties.
  3. The corners are in two loops of two cels each.
  4. No memorizing the adjusted coordinates — the dispose method does the adjustments itself.

That’s literally all there is to it.

[ , , ] 2 Comments on On SCI Windows – Part NaN – The Colonel’s Bequest

A Short Tangent – KQ6 Drop Caps

How does King’s Quest VI do that thing where if the Narrator says something, it includes a fancy drop cap? Well, it’s sorta similar to how KQ5 did, but implemented better. Mostly because it’s a newer game and not basically the first on a new engine.

Requirements: a view full of letters, all the same size, and a font where the tab character is as wide as one of these letters.

First, some technical backstory. Narrator is a special class with methods to speak a specific message. It will decide on its own if it should display the passed message in a window of some kind, or play it back as spoken audio. It will also handle timing, disposing of the window and everything at the end. The messages themselves are provided by the Messager class.

A Talker is a kind of Narrator that builds on the above to add talking heads. Fortunately we won’t have to go any deeper into those because this post is all about KQ6’s drop caps, and it’s only Narrator who uses those.

Specifically, KQ6 uses a special DropCapNarrator, in fact. It’s just like a regular Narrator, but overrides the display method to add some extra bits:

(class DropCapNarrator of Narrator
  (properties
    ; Narrator properties elided.
    strView 945 ; the view with the letters in
  )
 
  (method (display theText &tmp theTalkWidth newWindow theFirst theDropCap)
    ; Ensure we don't clip the screen edge.
    (if (> (+ x talkWidth) 318)
      (= theTalkWidth (- 318 x))
    else
      (= theTalkWidth talkWidth)
    )
 
    ; Clone up a new copy of one of those fancy woody windows.
    ((= newWindow (gWindow new:))
      color: color
      back: back
    )
    ; That is, set newWindow's colors to our own.
 
    ; If we have mouse support and we're not using the invisible
    ; cursor, remember what we -do- use and go invisible.
    (if (and (not (HaveMouse)) (!= gCursorNumber 996))
      (= saveCursor gCursorNumber)
      (gGame setCursor: 996)
    else
      (= saveCursor null)
    )
 
    ; Now we're ready for the magic.
 
    ; Grab the first letter of the message text we're to show.
    (= theFirst (StrAt theText 0))
    (if (and (>= 90 theFirst) (>= theFirst 65))
      ; The first character is between 'A' and 'Z' inclusive.
      ; Replace that first character with a tab.
      (StrAt theText 0 9)
      ; Remember, the tab is as wide as a drop cap!
 
      ; Create a new DIcon for our cap and set it up.
      ((= theDropCap (DIcon new:))
        view: strView
        ; Loop 0 is A to M, loop 1 is N to Z.
        loop: (+ 0 (/ (- theFirst 65) 13))
        cel: (mod (- theFirst 65) 13)
      )
 
      ; Now display our message on screen...
      (Print
        window: newWindow
        posn: x y
        font: font
        width: theTalkWidth
        title: (if showTitle name else null)
        ; ...but with the text shifted down a little...
        addText: theText 0 7
        ; ...and that DIcon on top of it.
        addIcon: newDIcon 0 0 0 0
        modeless: true
        init:
      )
    else
      ; Not a valid drop cap so we can skip all that.
      (Print
        window: newWindow
        posn: x y
        font: font
        width: theTalkWidth
        title: (if showTitle name else null)
        ; See? No positioning or DIcon here.
        addText: theText
        modeless: true
        init:
      )
    )
    ; The rest is up to the regular Narrator. 
  )  
)

Personally, I’d set up most of those properties, then stop and consider if we have a drop cap. Duplicating all those sends… it’s still better than what KQ5 did.

[ , , ] 2 Comments on A Short Tangent – KQ6 Drop Caps

On SCI Windows – Part 4 – King’s Quest 6

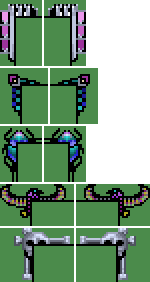
King’s Quest VI is particularly interesting in that the window frame looks like it has eight parts — four edges, four corners — but the actual view only has the corners. Compared to the simple lines of KQ5, those thick wooden beams have to be views, right?

 But as you can see, they’re not in there.

So how is that woody frame drawn then? The answer: they totally are lines.

(class Kq6Window of SysWindow
  (properties
    colorOne 32
    colorFive 18
    tlColorTwo 17
    tlColorThree 18
    tlColorFour 17
    brColorTwo 18
    brColorThree 17
    brColorFour 16
  )

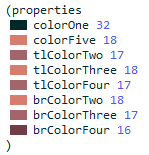
We interrupt this programming to give a bit of visual aid. Here’s those color properties again, but with the actual colors next to them:

Maybe you can see how they fit together, from the preview on top of the post and the property names.

(method (open &tmp oldPort)
    ; The established setup
    (= screens VISUAL)
    (if (!= priority -1) (= screens (| screens PRIORITY)))
 
    ; Make room for the edges
    (= lsTop (- top 5))
    (= lsLeft (- left 5))
    (= lsRight (+ right 6))
    (= lsBottom (+ bottom 6))
 
    ; Set our custom style
    (= type 128)
 
    ; Always top priority
    (= priority 15)
    (super open:)
 
    ; Now we draw, on the whole screen.
    (= oldPort (GetPort))
    (SetPort 0)
 
    ; Call the method shown below.
    (self drawEdgedWindow: screens)
 
    ; Add the corner pieces
    (DrawCel 930 0 0 (- left 5) (- top 5) -1)
    (DrawCel 930 0 1 (- left 5) (- bottom 1) -1)
    (DrawCel 930 0 2 (- right 1) (- top 5) -1)
    (DrawCel 930 0 3 (- right 1) (- bottom 1) -1)
 
    ; Show what we have wrought.
    (Graph grUPDATE_BOX lsTop lsLeft lsBottom lsRight 1)
    (SetPort oldPort)
  )
 
  ; This is where the actual magic happens.
  (method (drawEdgedWindow screens &tmp line color)
    ; Fill in the window
    (Graph grFILL_BOX top left (+ bottom 1) (+ right 1) screens back priority)
 
    ; Draw the top and left edges first
    (for ((= line 1)) (< line 6) ((++ line))
      (= color
        (switch line
          (1 colorOne) ; inside
          (2 tlColorTwo) ; dark
          (3 tlColorThree) ; light
          (4 tlColorFour) ; dark
          (5 colorFive) ; light
        )
      )
      ; Top edge
      (Graph grDRAW_LINE (- top line) (- left line) (- top line) (+ right line) color priority -1)
      ; Left edge
      (Graph grDRAW_LINE (- top line) (- left line) (+ bottom line) (- left line) color priority -1)
    )
 
    ; Draw the bottom and right edges
    (for ((= line 1)) (< line 6) ((++ line))
      (= color
        (switch line
          (1 colorOne) ; inside
          (2 brColorTwo) ; light
          (3 brColorThree) ; dark
          (4 brColorFour) ; very dark
          (5 colorFive) ; light
        )
      )
      ; Bottom edge
      (Graph grDRAW_LINE (+ bottom line) (- left line) (+ bottom line) (+ right line) color priority -1)
      ; Right edge
      (Graph grDRAW_LINE (- top line) (+ right line) (+ bottom line) (+ right line) color priority -1)
    )
  )
)

Those switch blocks could’ve been left out if they used, say, an array with the color values, but this way they can be exposed as properties. You win some, you lose some.

The drop cap is another story altogether.

[ , , ] Leave a Comment

On SCI Windows – Part 3 – King’s Quest 5

Compared to a BorderWindow, the custom frame used in King’s Quest 5 looks pretty straightforward. Indeed, it’s a few lines and some decorative corner pieces, mostly.

 Here they are right now.

Normally, the color properties would be set on startup depending on the detected color depth. Let’s pretend otherwise. Other than that, the below code is effectively unchanged — all I did was add comments.

(class myWindow of SysWindow
  (properties
    ; SysWindow properties elided.
    back 23
    color 8
    lineColor 19
  )
 
  (method (open &tmp screens theTop theLeft theBottom theRight celHigh celWide)
    ; Determine the size of our corner pieces.
    (= celHigh (CelHigh 944 0 0))
    (= celWide (CelWide 944 0 0))
 
    ; Draw on the main screen.
    (SetPort 0)
 
    ; Make some room.
    (= theTop (- top 8))
    (= theLeft (- left 8))
    (= theBottom (+ bottom 8))
    (= theRight (+ right 8))
 
    (= screens VISUAL)
    (if (!= priority -1) (= screens (| screens PRIORITY)))
 
    ; Save what's underneath us.
    (= underBits (Graph grSAVE_BOX theTop theLeft (+ theBottom 2) (+ theRight 2) screens))
 
    ; Draw a drop shadow
    (Graph grFILL_BOX (+ theTop 2) (+ theLeft 2) (+ theBottom 2) (+ theRight 2) screens 0 priority)
 
    ; Draw our fill
    (Graph grFILL_BOX theTop theLeft theBottom theRight screens back priority)
 
    ; Draw the corner pieces
    (DrawCel 944 0 0 theLeft theTop -1)
    (DrawCel 944 0 1 theLeft (- theBottom celHigh) -1)
    (DrawCel 944 0 2 (- theRight celHigh) theTop -1)
    (DrawCel 944 0 3 (- theRight celHigh) (- theBottom celHigh) -1)
 
    ; Top edges...
    (Graph grDRAW_LINE theTop (+ theLeft celWide) theTop (- theRight celWide) lineColor -1 -1)
    (Graph grDRAW_LINE (+ theTop 2) (+ theLeft celWide) (+ theTop 2) (- theRight celWide) lineColor -1 -1)
    ; Bottom...
    (Graph grDRAW_LINE (- theBottom 1) (+ theLeft celWide) (- theBottom 1) (- theRight celWide) lineColor -1 -1)
    (Graph grDRAW_LINE (- theBottom 3) (+ theLeft celWide) (- theBottom 3) (- theRight celWide) lineColor -1 -1)
    ; Left...
    (Graph grDRAW_LINE (+ theTop celHigh) theLeft (- theBottom celHigh) theLeft lineColor -1 -1 )
    (Graph grDRAW_LINE (+ theTop celHigh) (+ theLeft 2) (- theBottom celHigh) (+ theLeft 2) lineColor -1 -1)
    ; and right.
    (Graph grDRAW_LINE (+ theTop celHigh) (- theRight 1) (- theBottom celHigh) (- theRight 1) lineColor -1 -1)
    (Graph grDRAW_LINE (+ theTop celHigh) (- theRight 3) (- theBottom celHigh) (- theRight 3) lineColor -1 -1)
 
    ; Show what we have wrought.
    (Graph grUPDATE_BOX theTop theLeft (+ theBottom 2) (+ theRight 2) 1)
 
    ; Only now do we change our window type to custom and open it.
    (= type 129)
    (super open:)
 
    (= top theTop)
    (= left theLeft)
    (= bottom (+ theBottom 2))
    (= right (+ theRight 2))
  )
)

Don’t let the math discourage you. Because the corner pieces are drawn before the edge lines, the latter have to be carefully drawn right up against the former. You’ll see in the next part how you can get away with doing the edges first and then drawing the corners.

[ , , ] Leave a Comment